Mailchimp & Custom SubscribeForm with NextJS | Understand Next API Routes
January 30, 2023 - 10min - #mailchimp #email #axios #api #tutorial #webdev
Every Website needs an Email Newsletter. MailChimp is a popular service for that. Here is how you can connect it to NextJS with a custom SubscribeForm - and learn API routes in the process!
Table of Contents
- Requirements
- Custom SubscribeForm
- SubcribeForm Handler Setup
- .env.local Setup
- Get Auth Data from Mailchimp
- Next API Setup
- SubcribeForm User-Feedback
0. Requirements
To get it rolling as smooth as possible, you need to have a NextJS project with
- these NextJS Installation settings,
- and this pages routing structure.
It will still work in many other cases (including with premade components), but you would need to make adjustments in filepaths etc.
Also make sure to install the HTTP request client
Axios: npm install axios
1. Custom SubscribeForm
Growing an email list can be one of the main objectives of a blog. So I found an everpresent subscribe form in the fixed header to be a cool idea. To keep it a bit less in your face I only want it to be fully expanded, once clicked. Here is the logic for that:
// without anything unrelated to SubscribeFormHeader.js
import SubscribeForm from './SubscribeFormHeader';
import { useState, useEffect } from 'react';

export default function Header({}) {
  const [showSubscription, setShowSubscription] = useState(false);

  const handleSubscribeClick = () => {
    setShowSubscription(true); // statechange that opens the form
  };

  const handleCancel = () => {
    setShowSubscription(false); // statechange that closes the form
  };

  return (
    <header>
      <nav>
        <Link>
          <h1>LeonWarscheck</h1>
        </Link>
        <ul>
          <li>
            <Link>About</Link>
          </li>
          <li>
            <button
              onClick={handleSubscribeClick} // triggers the conditional rendering via statechange
            >
              Subscribe
            </button>
            {showSubscription && ( // conditional rendering
              <SubscribeForm
                onCancel={handleCancel}
                onSubscribe={handleCancel} // both props are doing the same, just at different places in the interaction with the form
              />
            )}
          </li>
        </ul>
        <Menu />
      </nav>
    </header>
  );
}
And here is whats going on in the Form component, including how to jump the cursor into the email-input, once the form opens:
import axios from 'axios';
import { useEffect, useRef } from 'react';

export default function SubscribeForm({ onCancel, onSubscribe }) {
  // getting props from Header.js
  const inputRef = useRef(null); // useRef directly accesses the input dom-element

  useEffect(() => {
    if (inputRef.current) {
      // .current is built into useRef and parses the referenced dom-element, once it mounts into the dom-tree
      inputRef.current.focus(); // .focus() places the cursor into the input
    }
  }, []);

  const handleSubscribe = async event => {
    // see next chapter "2. SubscribeForm Handler Setup"
    onSubscribe(); // triggers closing of form in Header.js after successful subscription (same as onCancel)
  };

  return (
    <form onSubmit={handleSubscribe}> // see next section
      <input
        type="email"
        name="email"
        placeholder="Email"
        required
        autoCapitalize="off"
        autoCorrect="off"
        ref={inputRef} // useRef api
      />
      <button type="submit">Subscribe</button>
      <button onClick={onCancel}> // triggers conditional (un-)rendering of subForm component in Header.js
        Cancel
      </button>
    </form>
  );
}
2. SubscribeForm Handler Setup
Now let's look at the "handleSubscribe" component. You can find all the detailed explanations in the comments:
import axios from 'axios'; // Import axios for HTTP requesthandling inside of the subscribehandler.

export default function SubscribeForm({}) {
  const handleSubscribe = async event => {
    // Recieve onSubmit event-object.
    event.preventDefault(); // Prevent the default form submission behavior.

    try {
      // Get formData from the event.target (the email-form).
      const formData = new FormData(event.target);
      // Get the email value from formData. Make sure to use input name="email".
      const email = formData.get('email');

      // Make a POST request to your subscribeApi route.
      const response = await axios.post('/api/subscribeApi', { email });

      // Handle the response from your API route.
      console.log(response.data);
    } catch (error) {
      console.error(error);
    }
  };

  return (
    <form onSubmit={handleSubscribe}>
      // Insert eventhandler function as jsx.
      <input // Use these attributes, especially name="email".
        type="email"
        name="email"
        placeholder="Email"
        required
        autoCapitalize="off"
        autoCorrect="off"
      />
      // subform details left out for focus. more in section 6. SubscribeForm
      User-Feedback
    </form>
  );
}
3. .env.local Setup
Create a .env.local file in your root directory and insert the following
variable names just like this:
MAILCHIMP_API_KEY = xxxxxxxxxxxxxxxxxxxxxxxxxxxxxxxxxyyyy;
MAILCHIMP_API_SERVER = yyyy;
MAILCHIMP_AUDIENCE_ID = zzzzzzzzzz;
I left the xyz to give you a reference point for the length of their values. Replace them with the real values in the next section (no "string"-quotes needed around the values).
But before that, add this into your .gitignore file to ensure no one except
you has access to the environment variables:
# local env files
.env*.local
Later, when you deploy your next-app, you will leave both files as they are to stay able to develop locally, but very likely copy the values directly into the deployment service API gui (e.g. Vercel).
4. Get MailChimp Auth Data
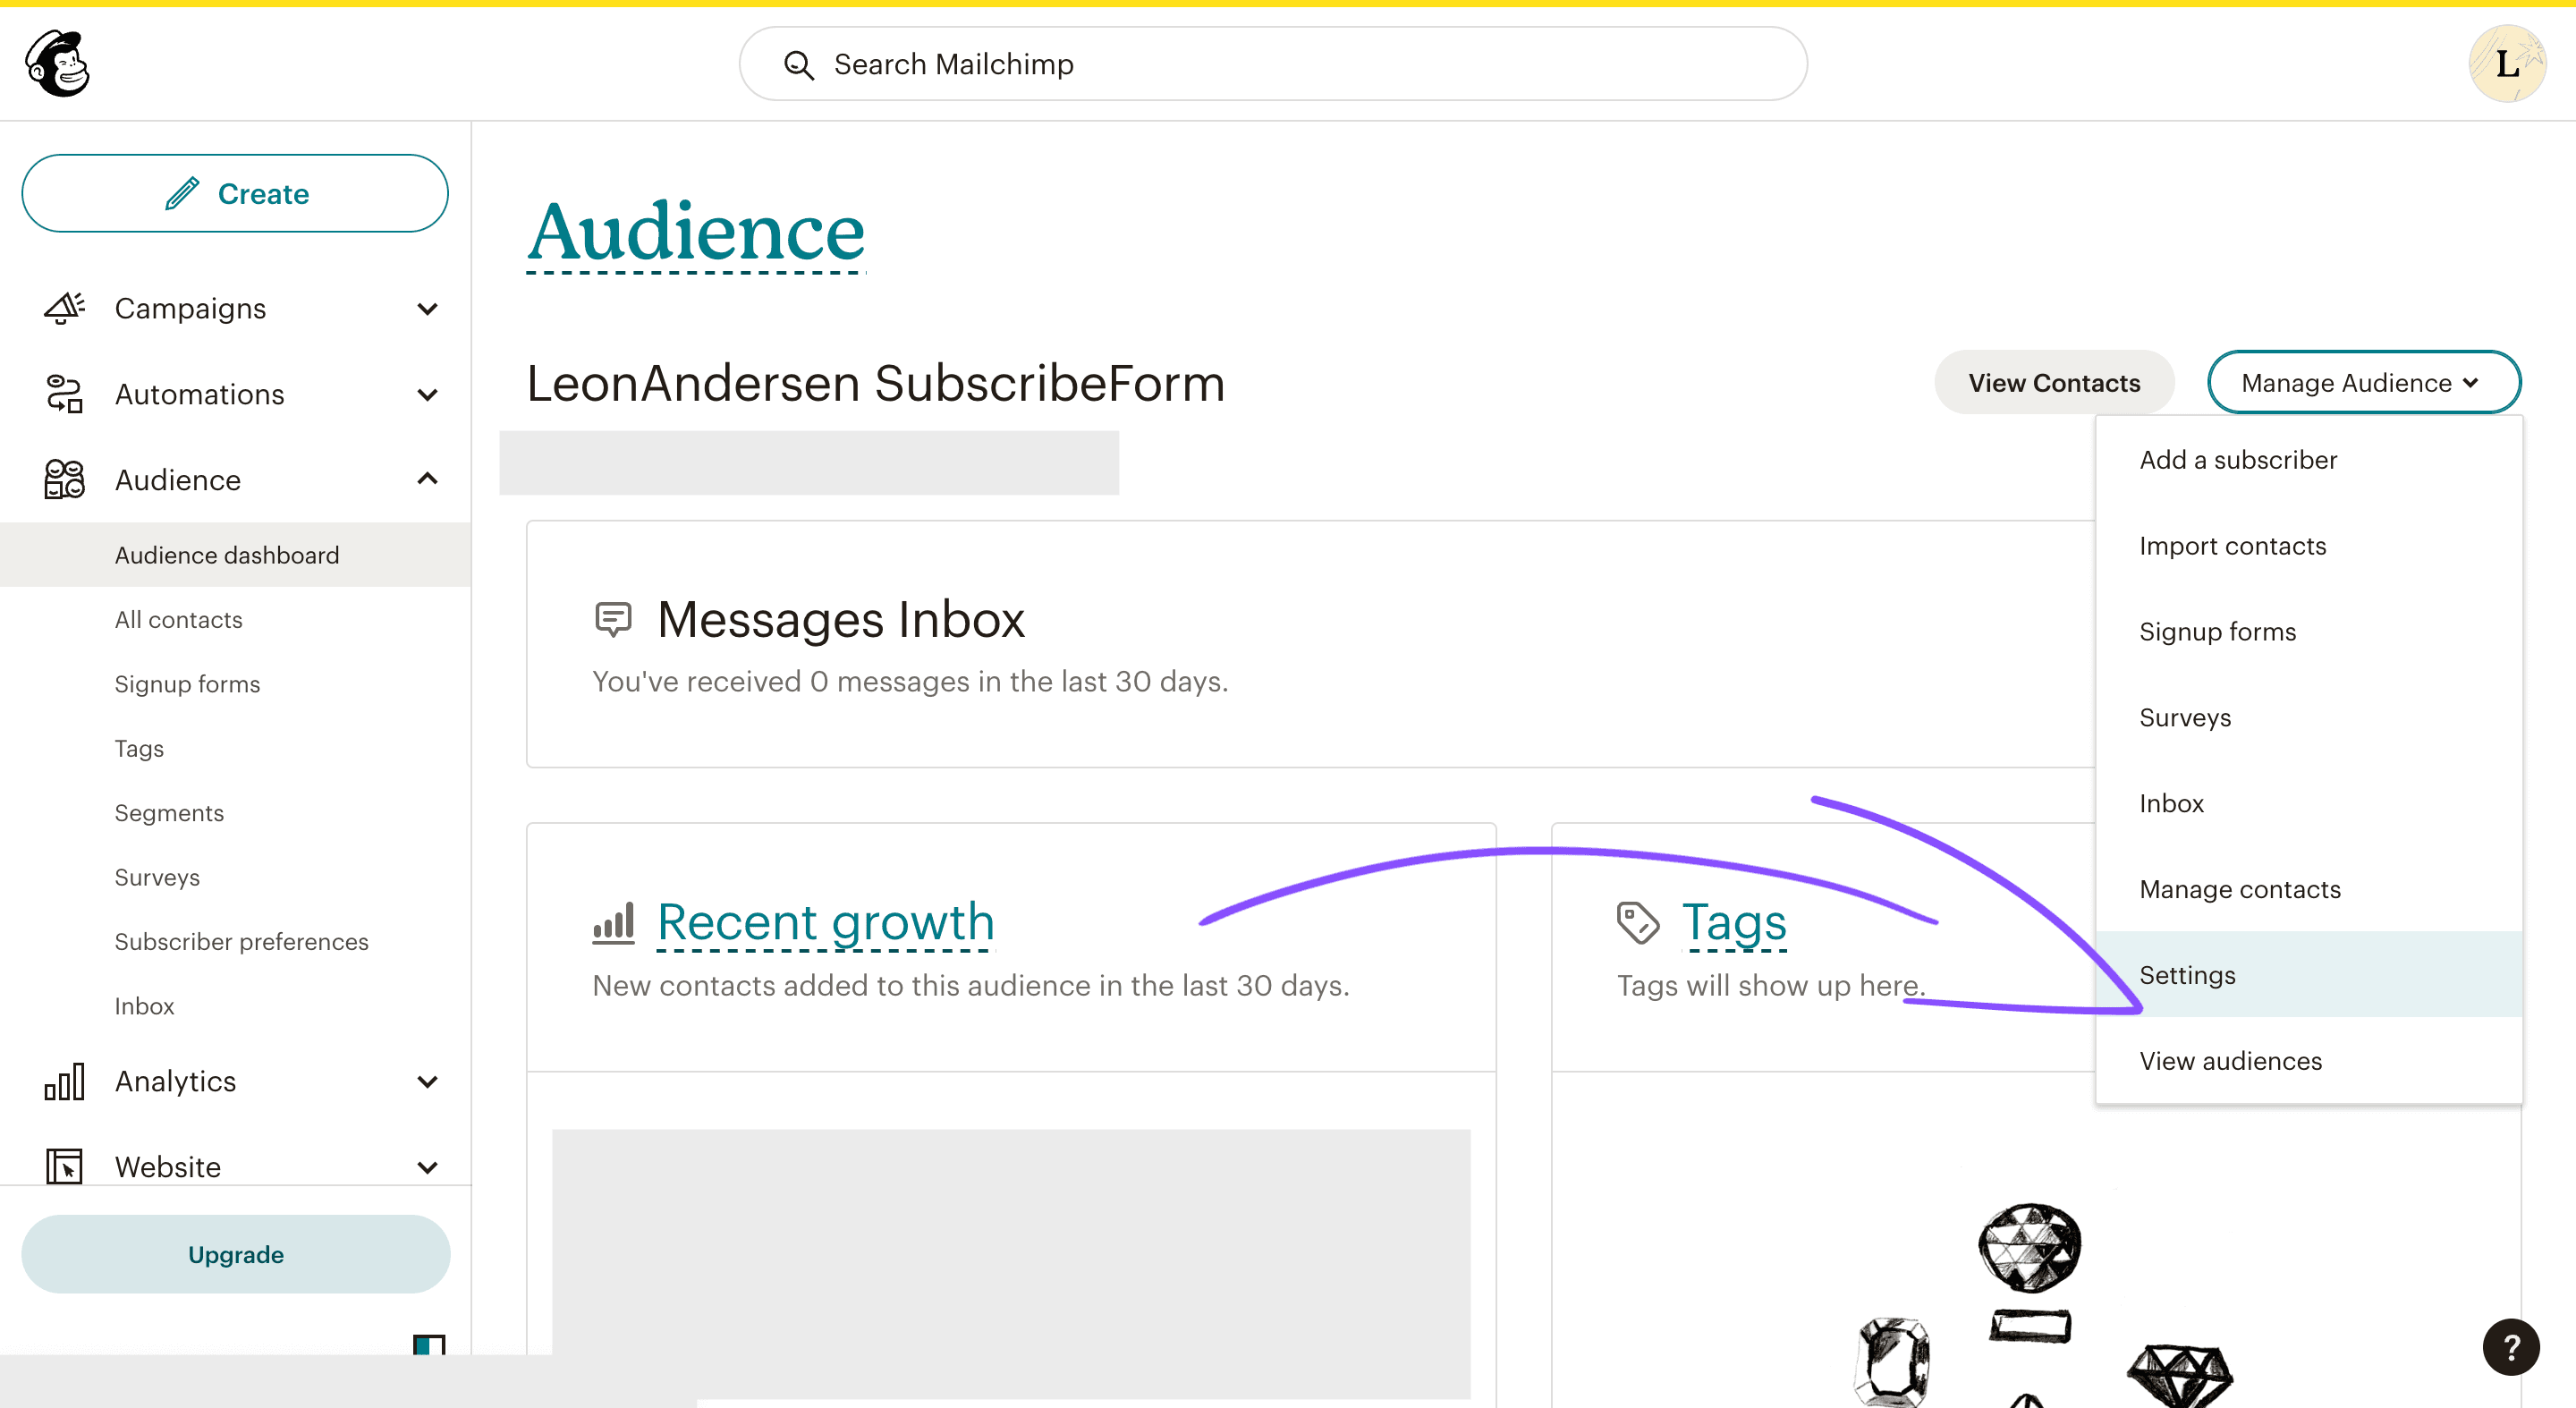
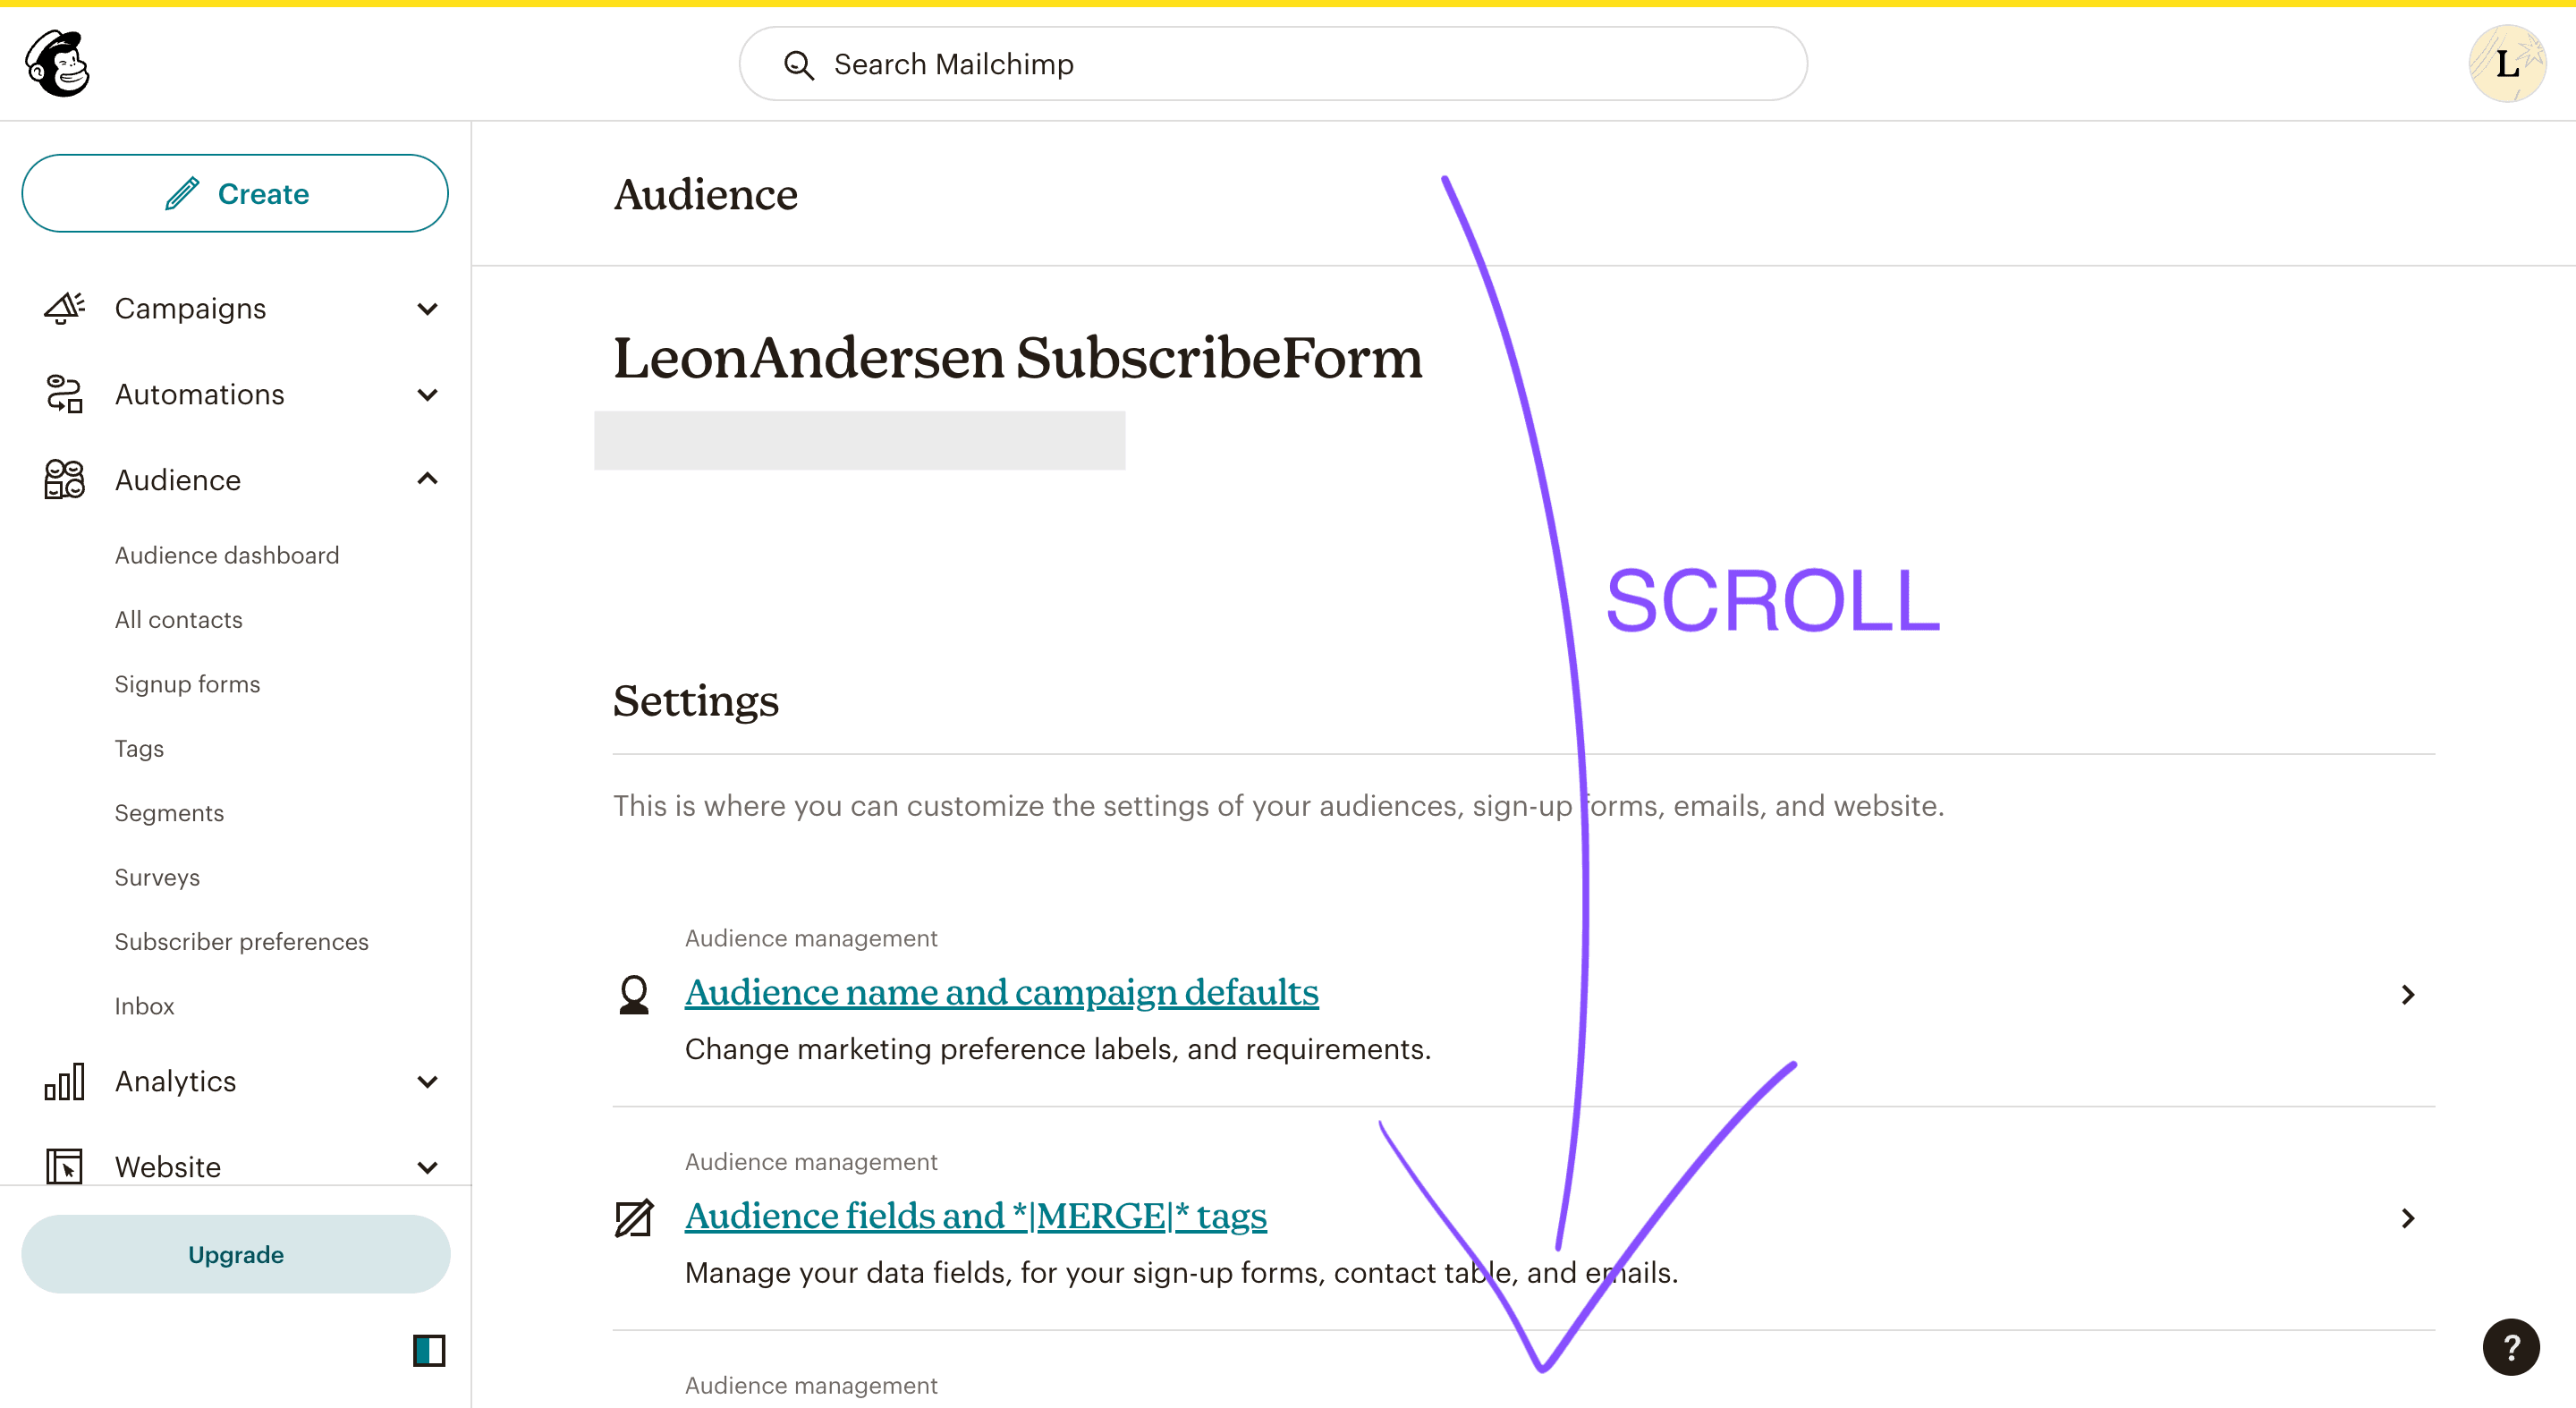
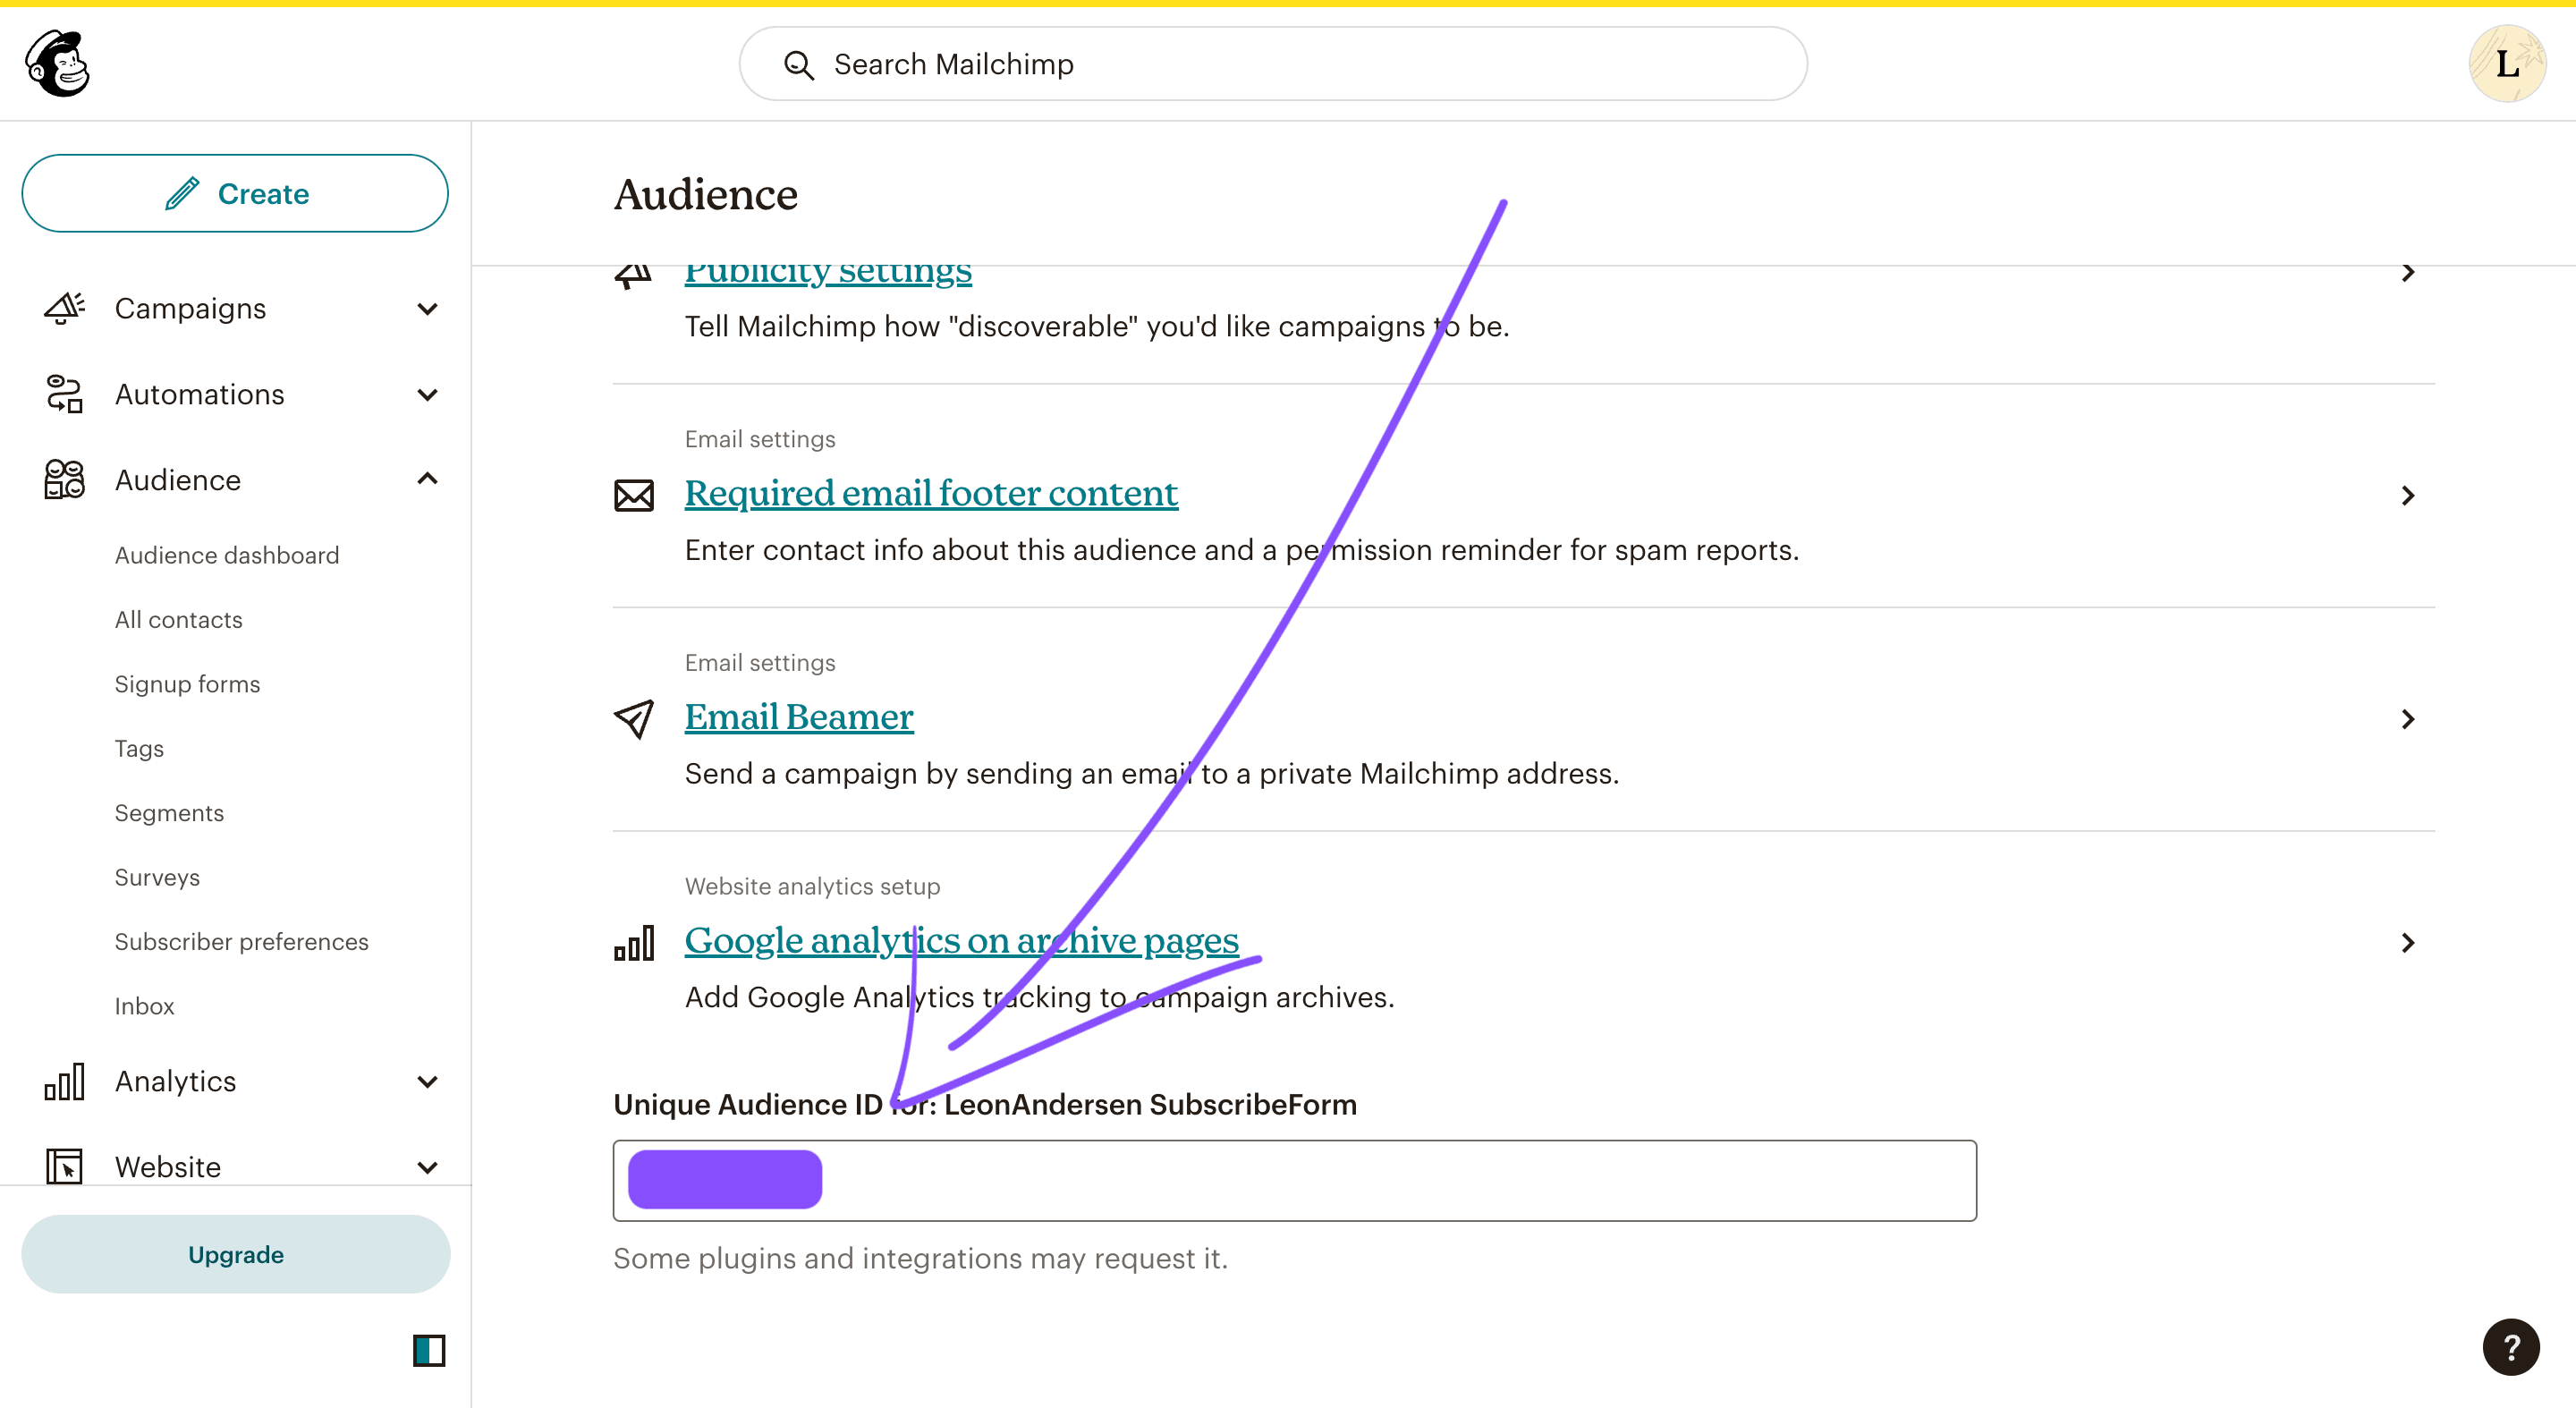
Now sign up to mailchimp and follow this screenshot journey to copy the auth
data into the x-placeholders in .env.local:
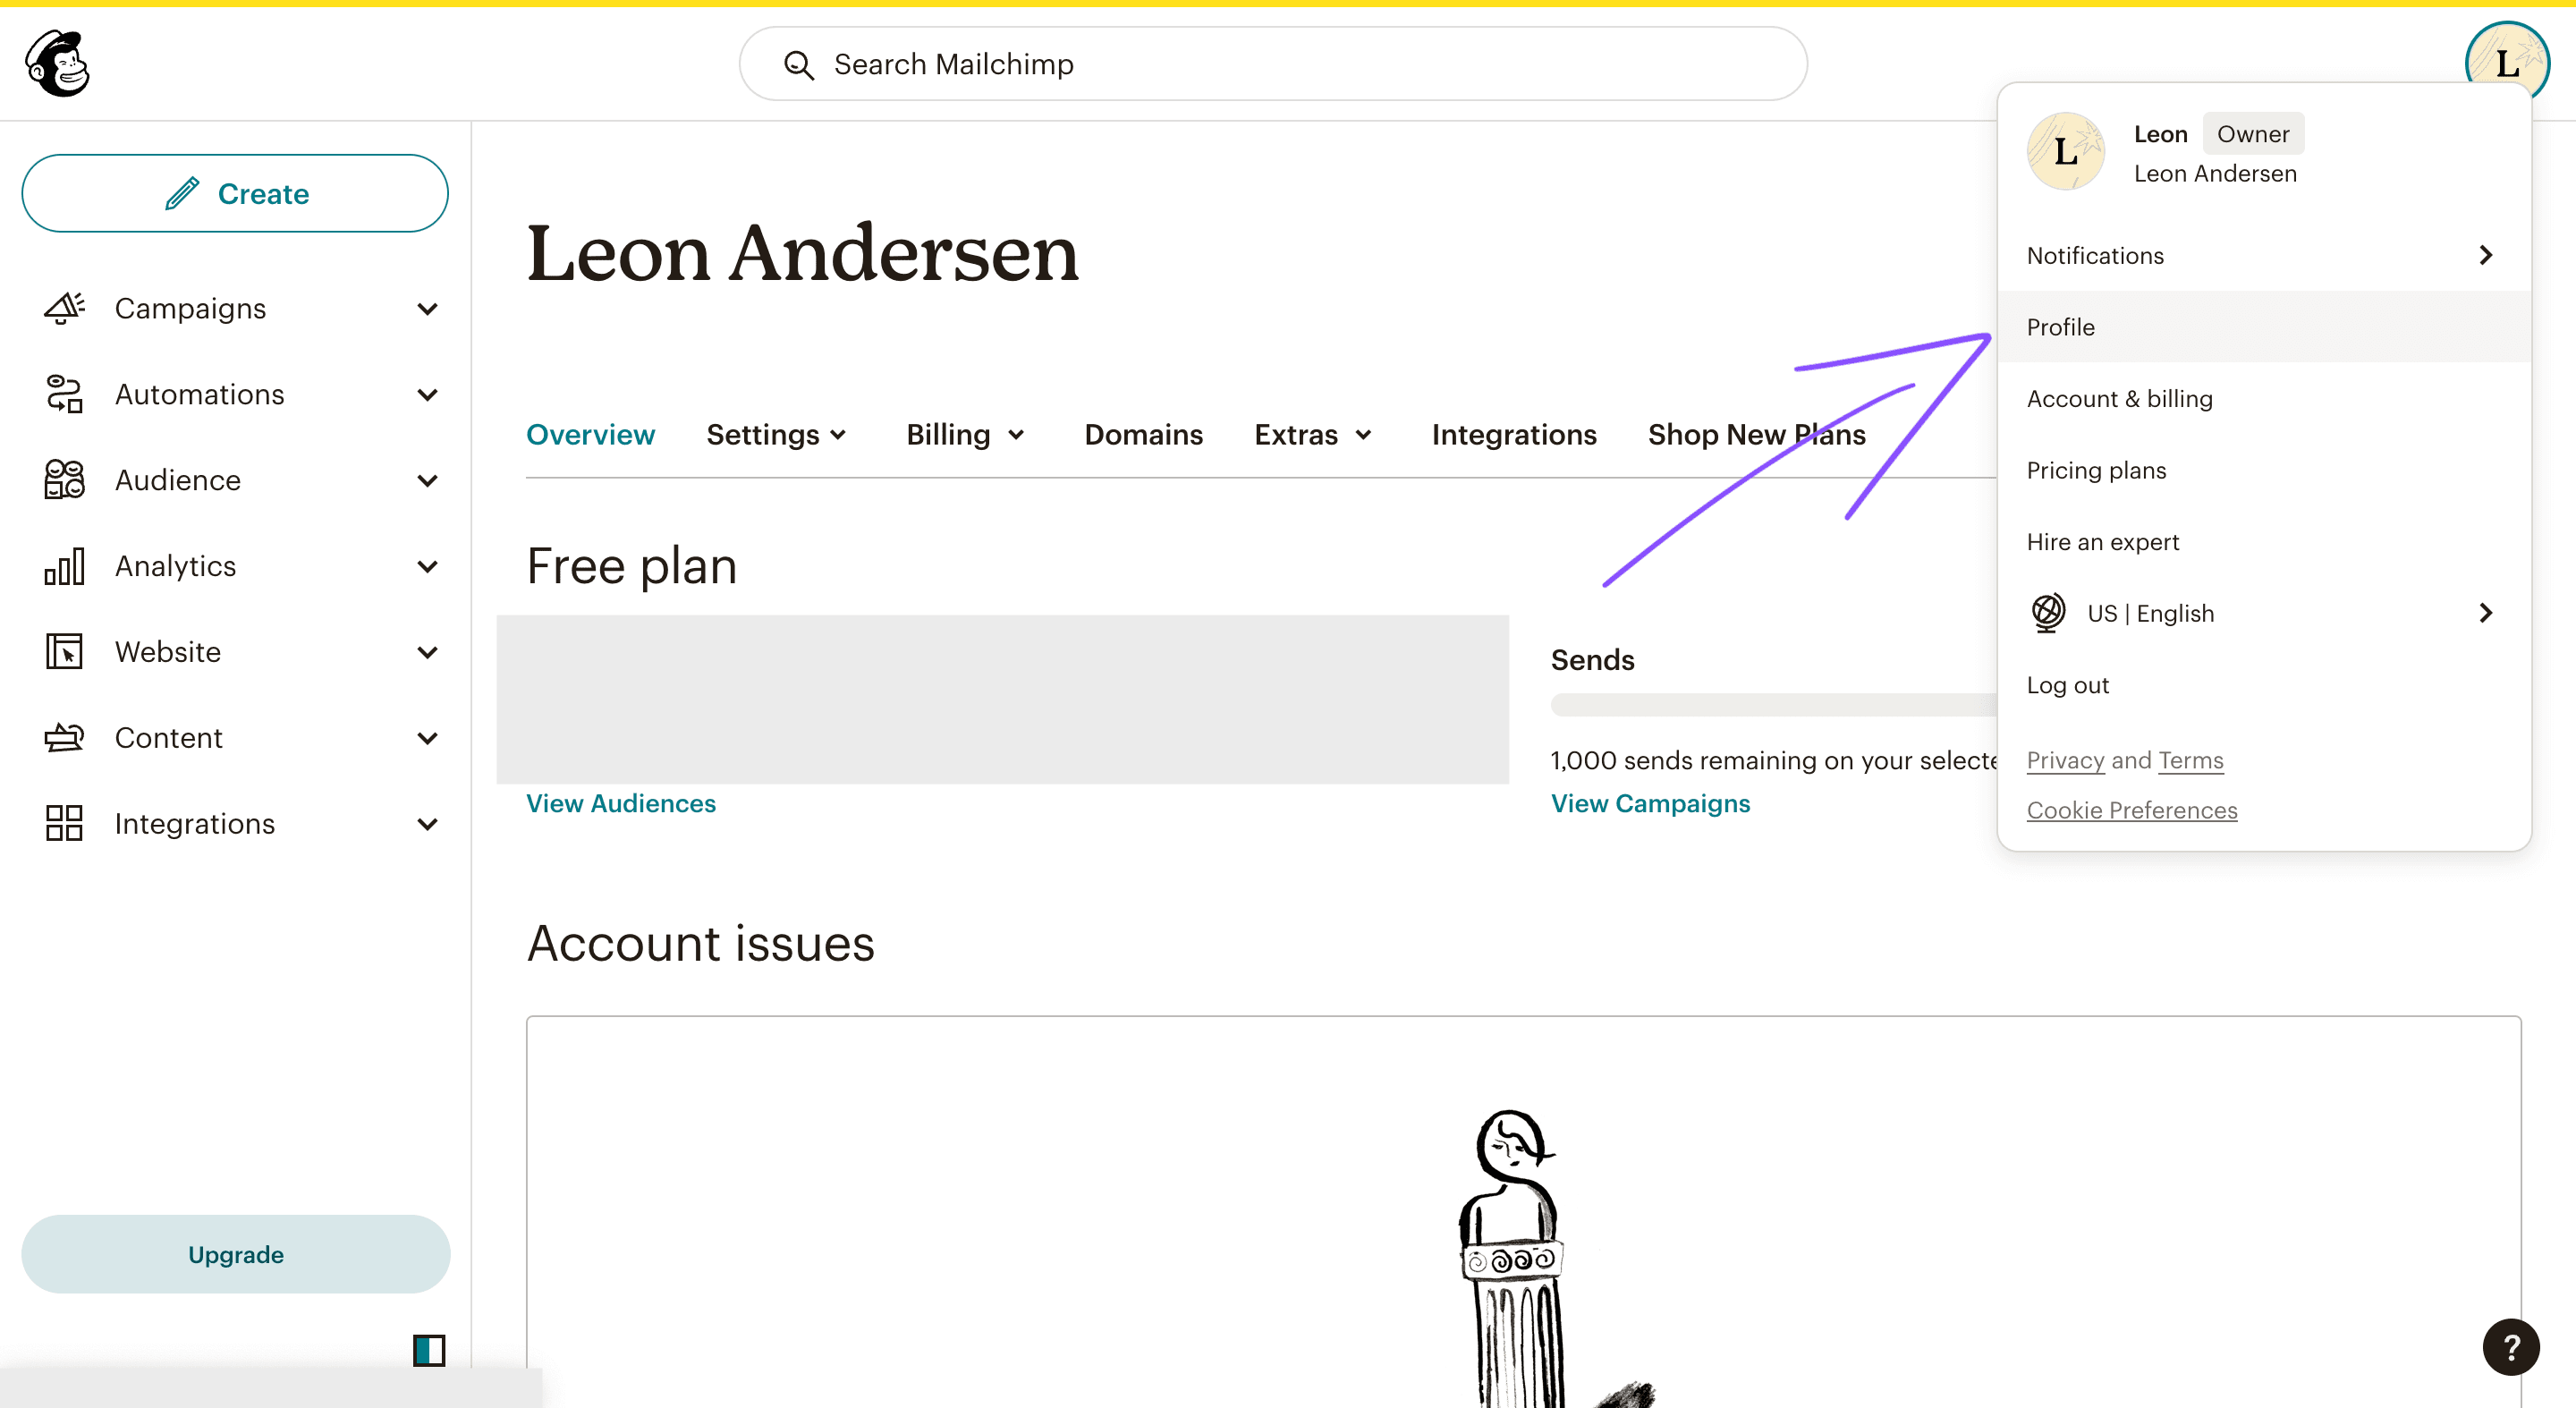
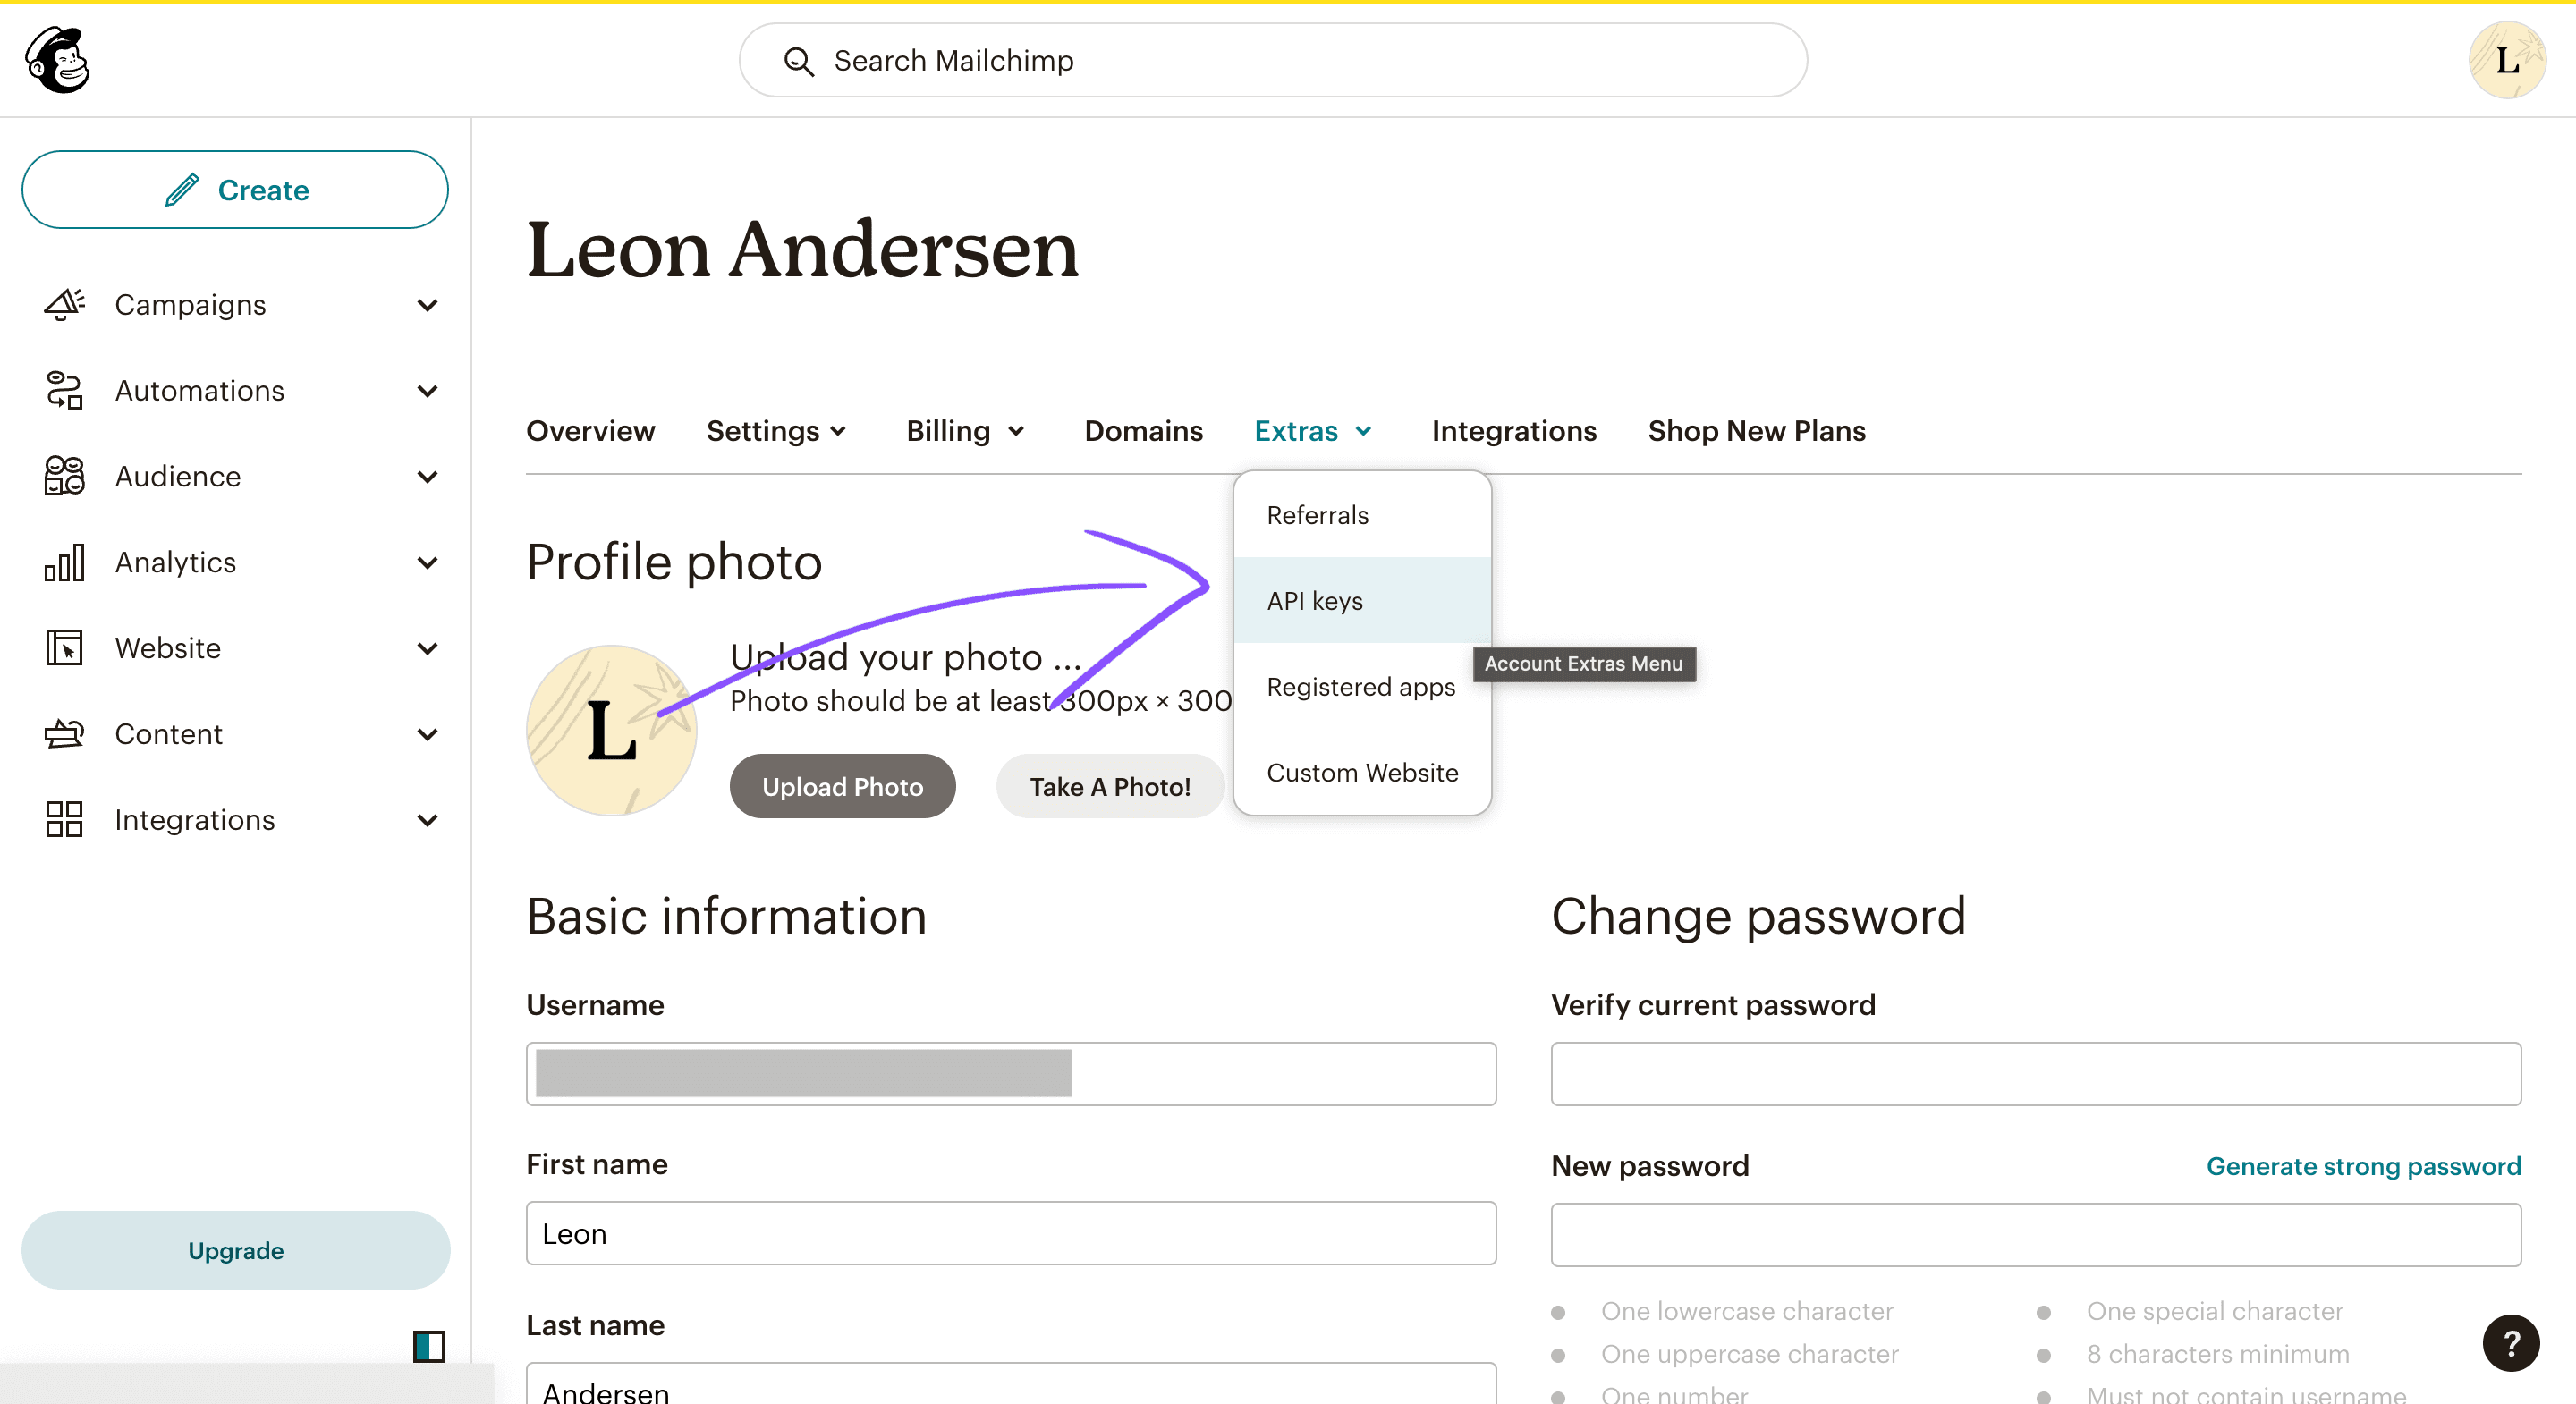
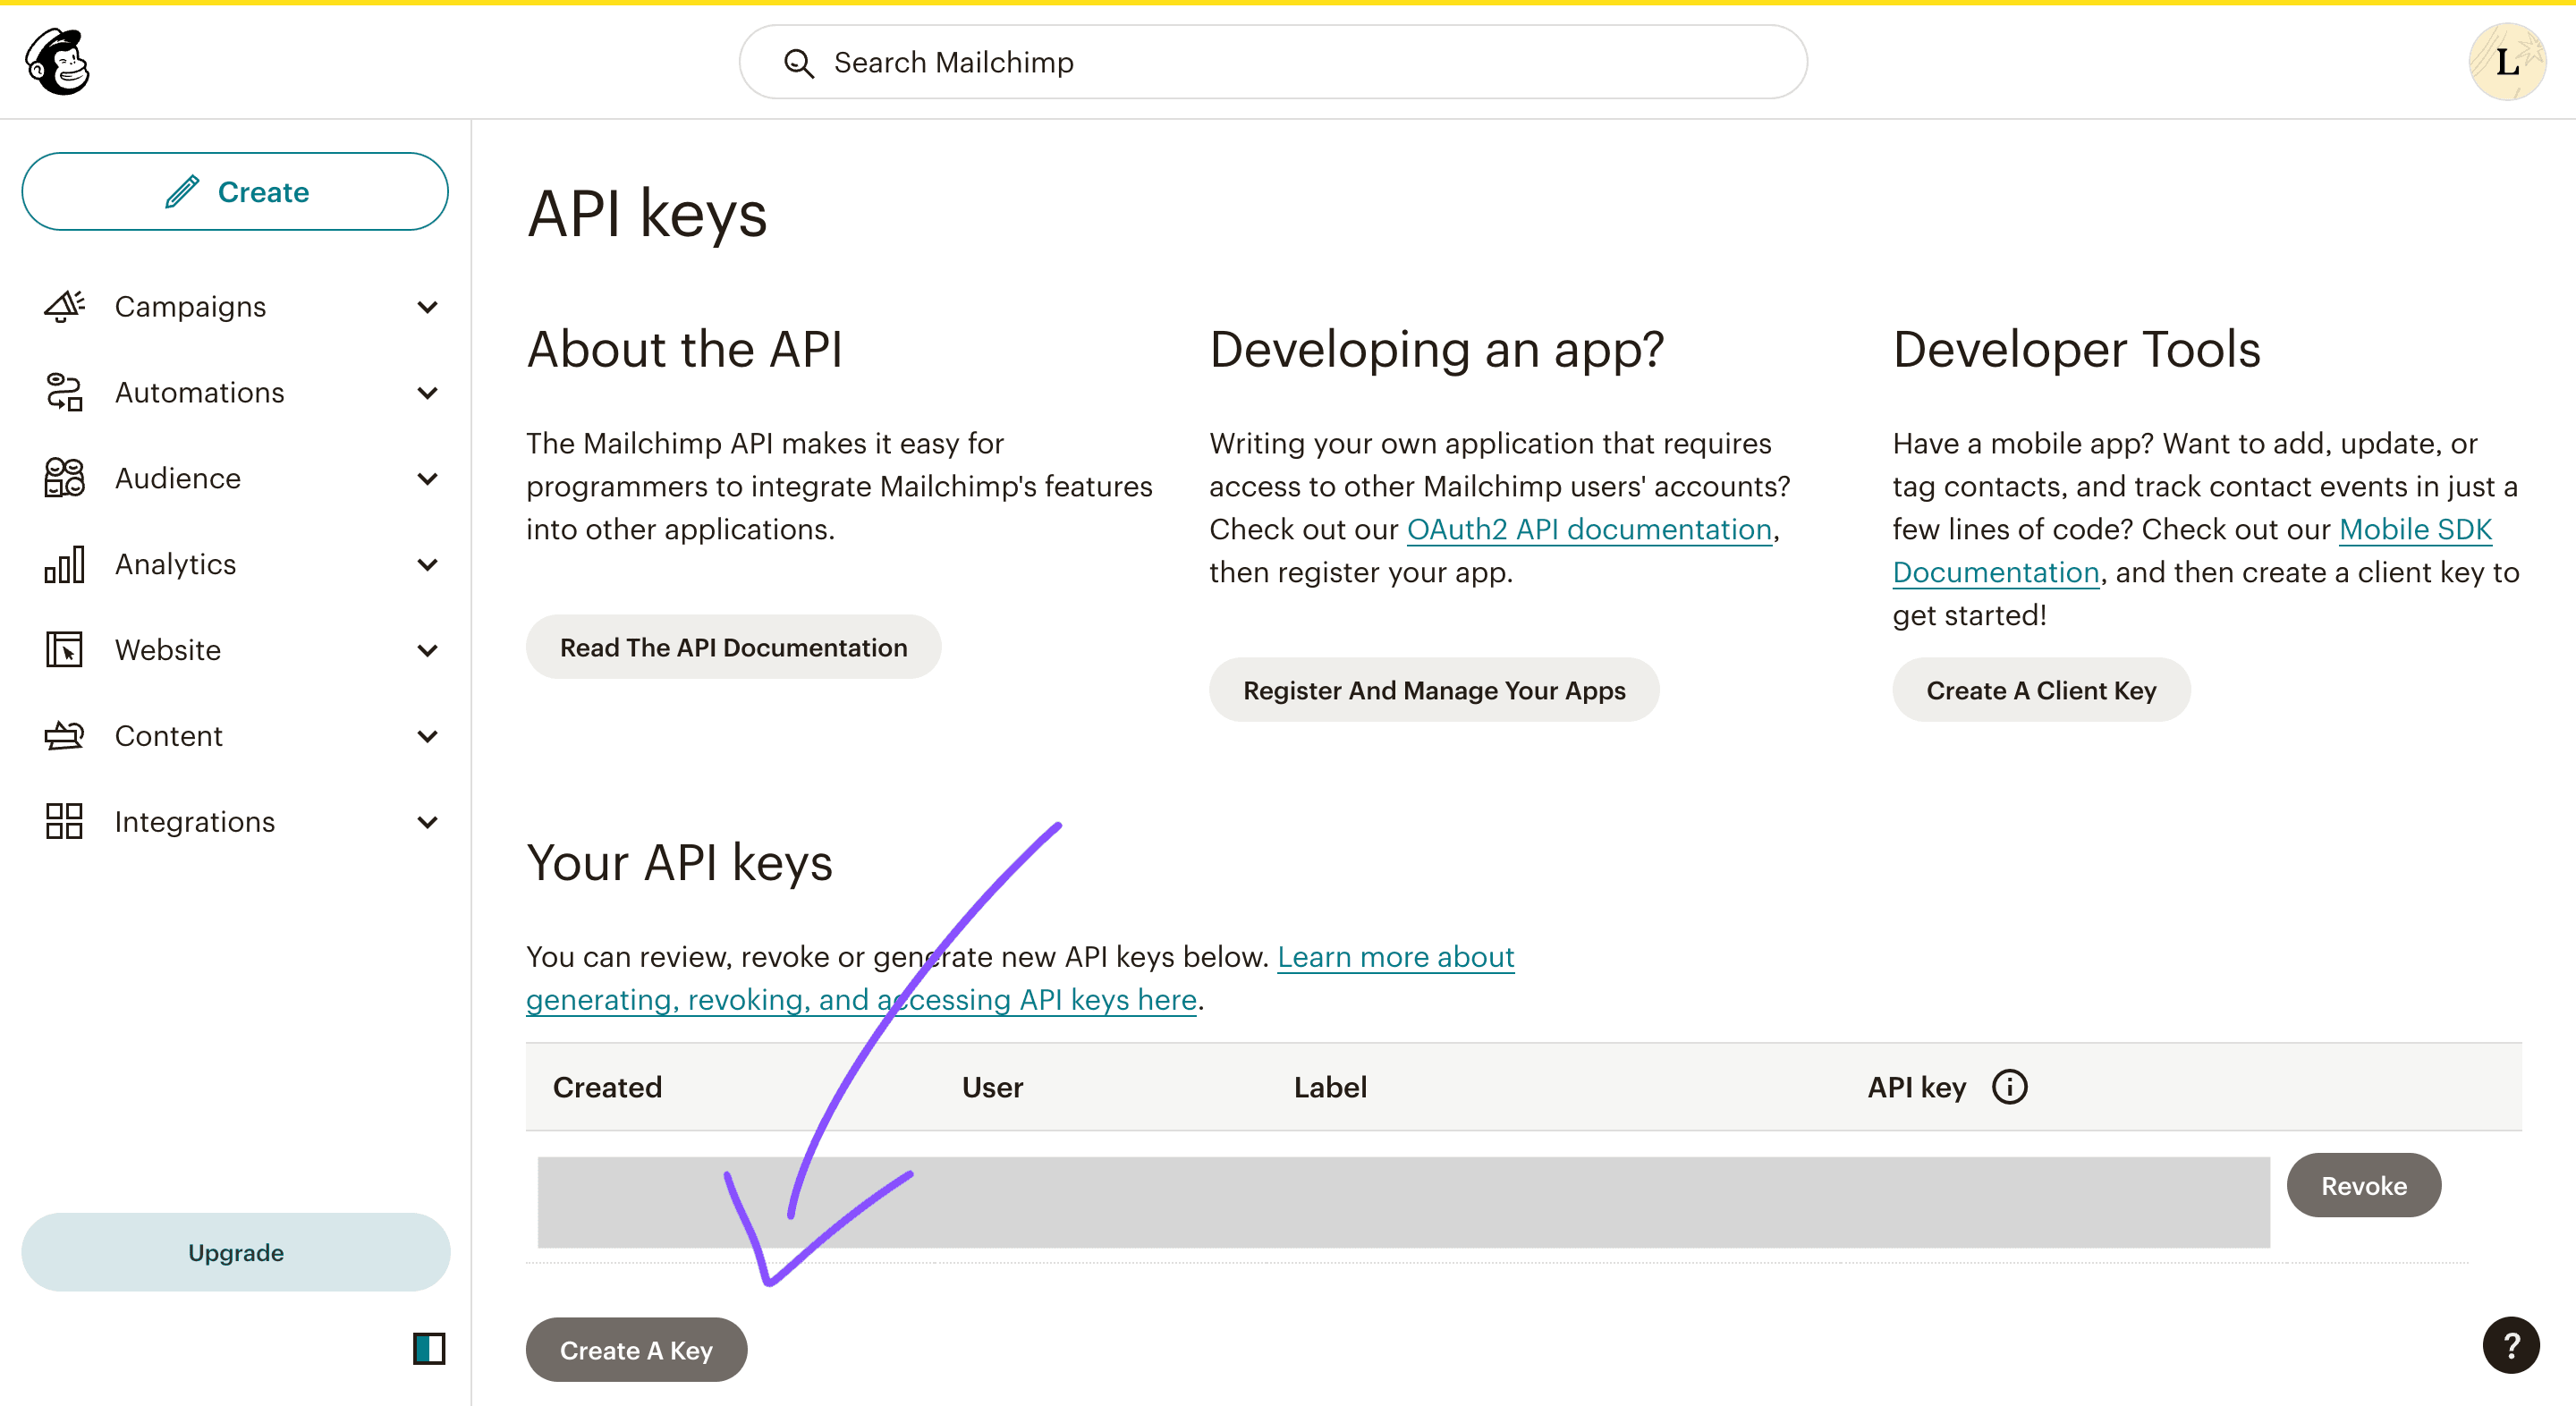
Create a new API key and paste it into your .env.local. The last 4 characters are also your MAILCHIMP_API_SERVER value.
Now find and copy-paste the MAILCHIMP_AUDIENCE_ID like this:
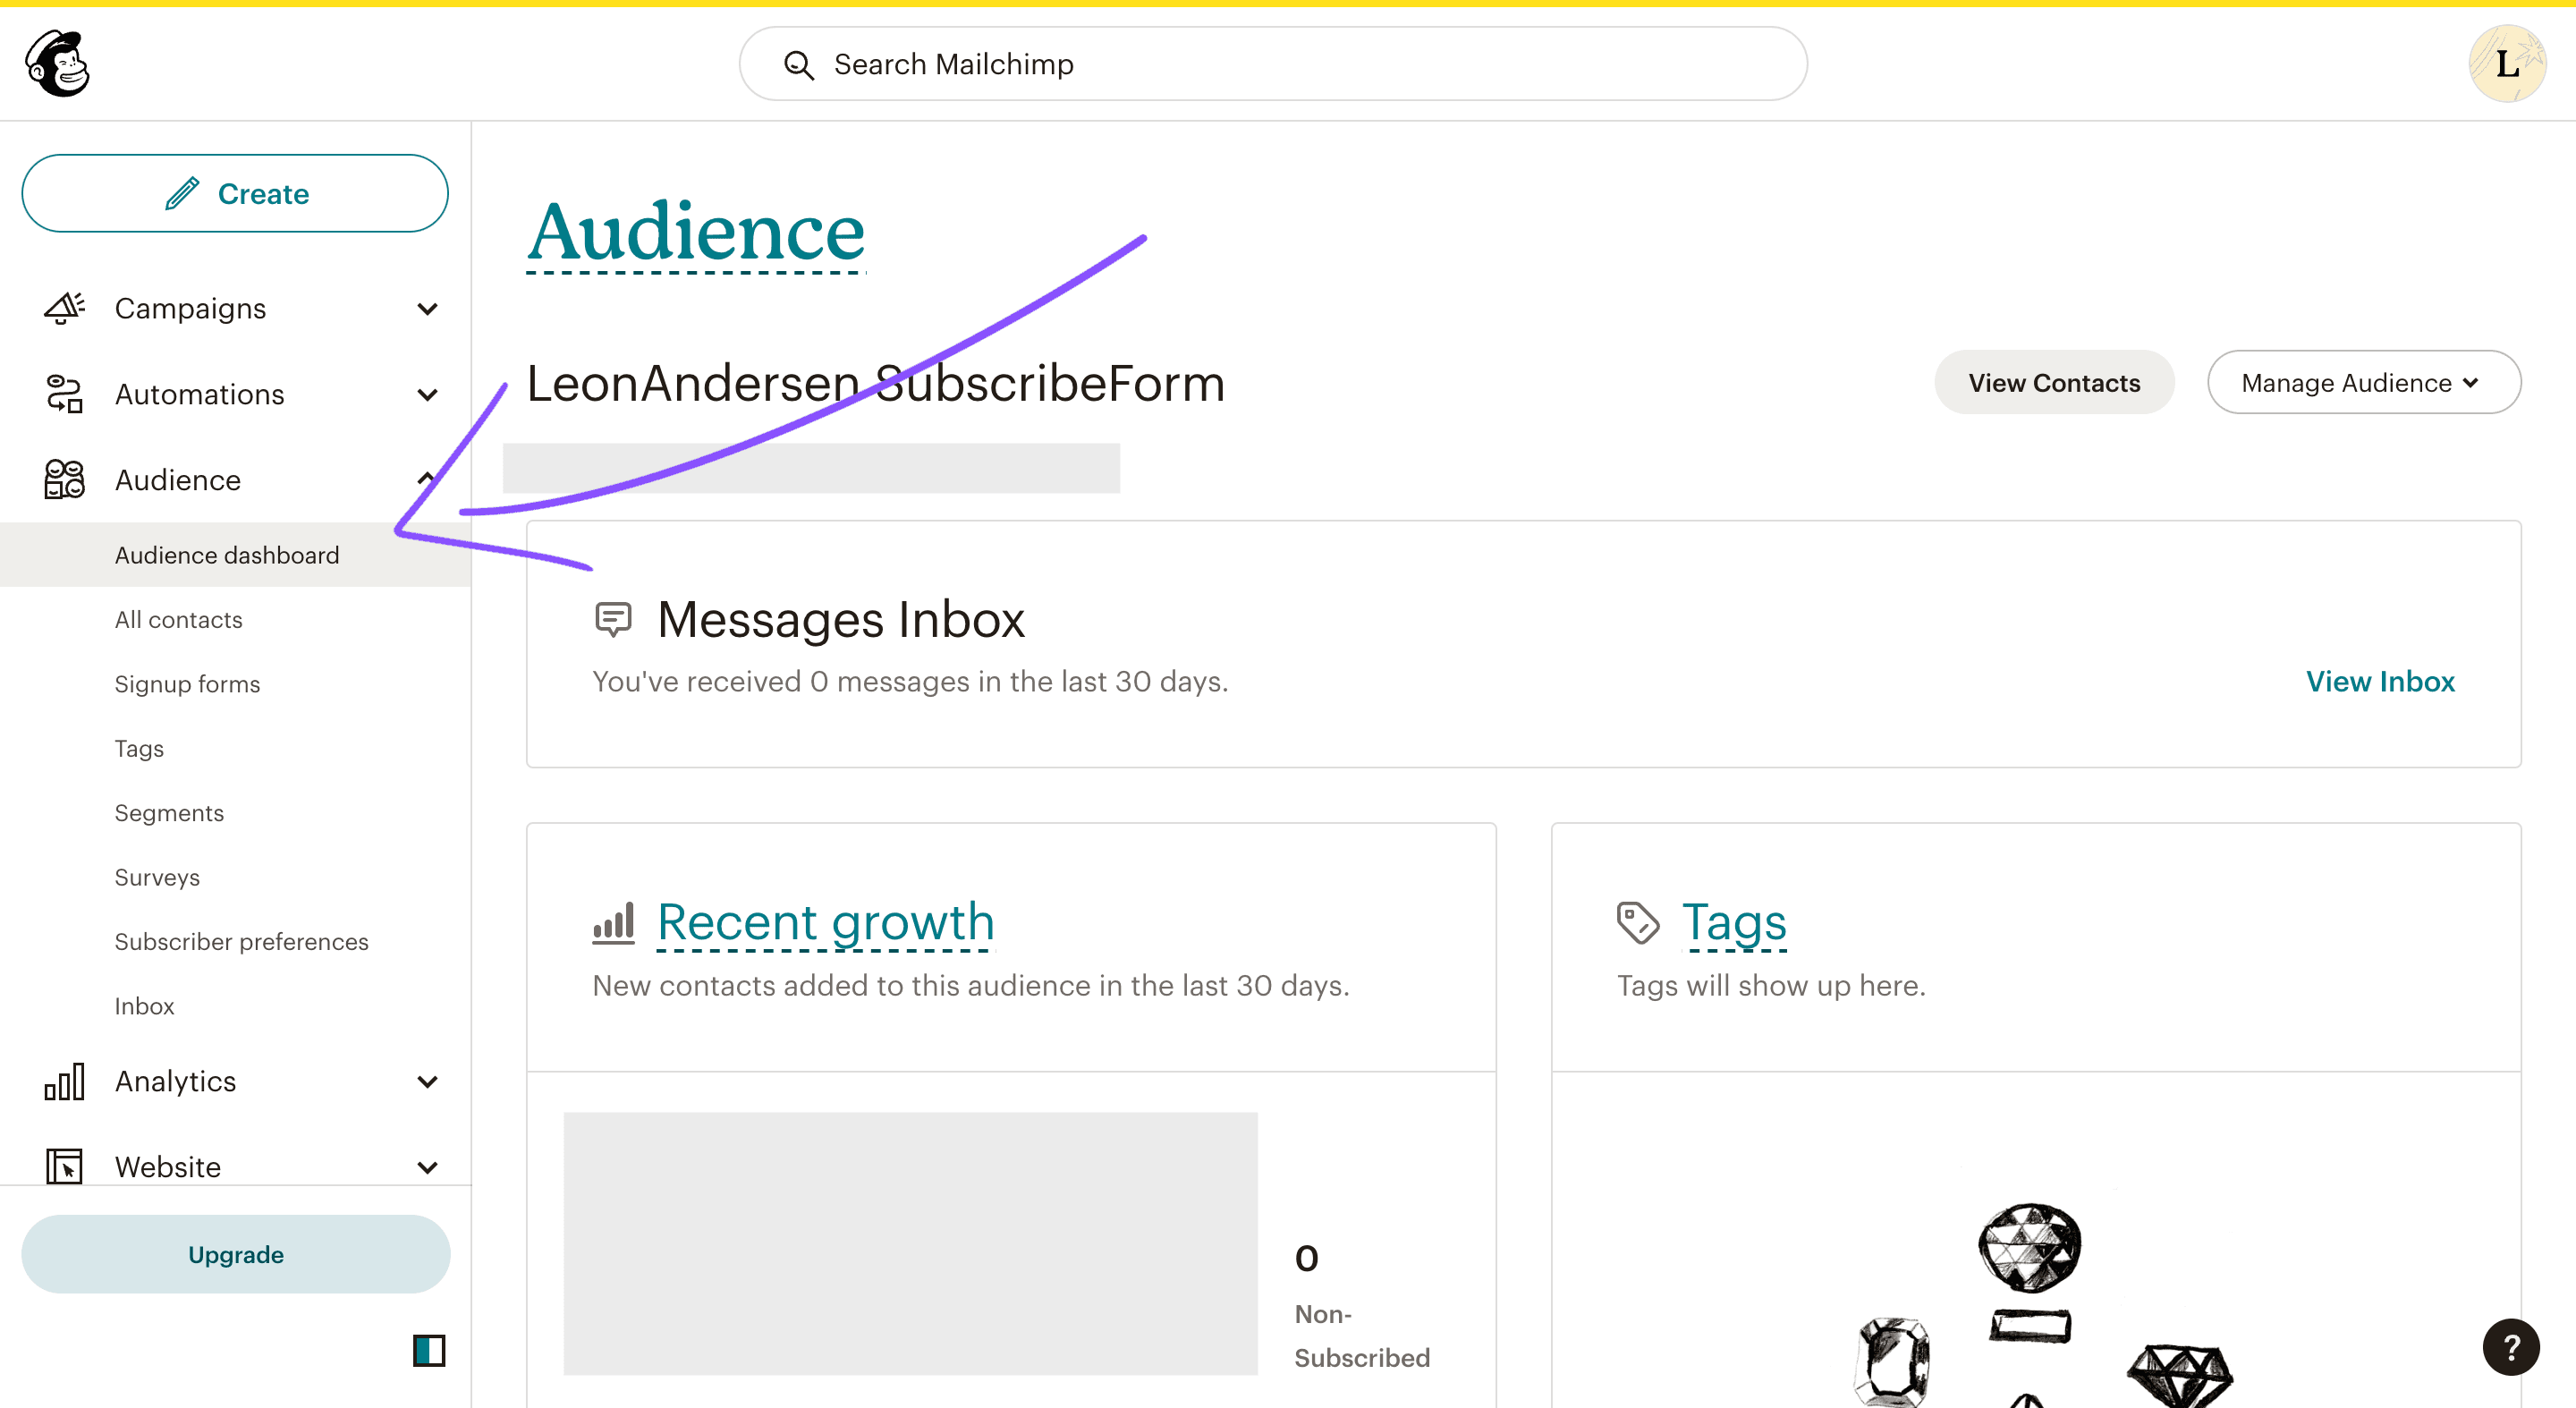
You now have all neccessary auth data set up in your local environment variables.
5. Next API Setup
In section 1, your submithandler in SubscribeForm.js has sent a post request
to your API route. Now your postHandler in subscribeApi.js structures the
email- and auth-data from .env.local in a mailchimp-specific format and sends
the final HTTP package via axios.post.
Next API is the "backend middleman" between the client and the mailchimp api
like this: Client <=> NextAPI <=> MailChimpAPI. This makes sure that the
private authorization data can not get accessed by the browser.
import axios from 'axios'; // Import axios for HTTP requesthandling.

export default async function postHandler(req, res) {
  // Recieve requests (from SubscribeForm.js).

  if (req.method === 'POST') {
    // Only allow post requests.
    try {
      // Get authorization data from .env as variables.
      const API_KEY = process.env.MAILCHIMP_API_KEY;
      const AUDIENCE_ID = process.env.MAILCHIMP_AUDIENCE_ID;
      const DATACENTER = process.env.MAILCHIMP_API_SERVER;
      // Dynamically place auth data into the mailchimp request route (datacenter and audienceID are comparable to user-email for logging into a service).
      const mailchimpEndpoint = `https://${DATACENTER}.api.mailchimp.com/3.0/lists/${AUDIENCE_ID}/members`;
      // Get email value from axios request.
      const email = req.body.email;

      // Sending the post request triggers a response by mailchimp, which gets captured by the variable.
      const response = await axios.post(
        // Insert request route.
        mailchimpEndpoint,
        {
          // Mailchimp specific data structure to send email data.
          email_address: email,
          status: 'subscribed',
        },
        {
          // Send api key (aka password) via the request header in mailchimp specific format.
          headers: {
            Authorization: `Basic ${Buffer.from(
              `anystring:${API_KEY}`,
            ).toString('base64')}`,
          },
        },
      );

      // Log mailchimp response that we just captured in the response variable.
      console.log(response.data);

      // Respond to client.
      res.status(200).json({ success: true });
    } catch (error) {
      console.error(error); // Handle errors.
      res.status(500).json({ success: false, error: 'Internal Server Error' });
    }
  } else {
    // Handle unsupported request methods.
    res.status(405).json({ success: false, error: 'Method Not Allowed' });
  }
}
6. SubcribeForm User-Feedback
Now, that you have the postHandler API running, the final step is to make
sure, that the user gets some visual feedback about the state of his submission
(in progress, success, failure).
import axios from 'axios';
import { useState, useEffect, useRef } from 'react'; // Import useState.
export default function SubscribeForm({ onCancel, onSubscribe }) {
const [responseStatus, setResponseStatus] = useState(''); // Capture the different API responses to use them for conditional rendering below.
const [isSubmitting, setIsSubmitting] = useState(false); // Capture boolean, if a submission is already in process.
const inputRef = useRef(null);
useEffect(() => {
if (inputRef.current) {
inputRef.current.focus();
}
}, []);
const handleSubscribe = async event => {
event.preventDefault();
if (isSubmitting) return; // Abort functioncall, if another submission is already in progress to avoid double requests.
setIsSubmitting(true); // Set submission state on first call of function. Has to be after the abortion mechanism.
inputRef.current.blur(); // Give user a first visual feedback (blur = remove cursor focus), while waiting for the response.
try {
const formData = new FormData(event.target);
const email = formData.get('email');
const response = await axios.post('/api/subscribeApi', { email });
console.log(response.data);
setResponseStatus('success'); // FeedbackState to trigger success-message.
} catch (error) {
console.error(error);
setResponseStatus('failure'); // FeedbackState to trigger failure-message (ignorant of specific Error).
} finally {
setIsSubmitting(false); // Set submission cycle to be finished, re-enabling sumbit button for new submission attempts.
setTimeout(() => onSubscribe(), 2500); // Trigger closing of SubscribeForm in Header.js (see section 1.). Set duration of message being displayed.
setTimeout(() => setResponseStatus(''), 3000); // Hides message. Make sure to trigger after closing of form, as it is part of the form.
}
};
return (
<>
// Conditional rendering via strict equality with state-string. // Enables
infinite state conditions vs boolean.
{responseStatus === '' && ( // Condition 1. (Default, pre submit)
<form onSubmit={handleSubscribe}>
<input
type="email"
name="email"
placeholder="Email"
required
autoCapitalize="off"
autoCorrect="off"
ref={inputRef}
/>
<button
type="submit"
disabled={isSubmitting} // Multi submission prevented by disabling submit button via isSubmitting state in handleSubscribe.
>
Subscribe
</button>
<button onClick={onCancel}>Cancel</button>
</form>
)}
// In this example you would render the messages overlaying the header
buttons.
{responseStatus === 'success' && ( // Condition 2.
<p>
Success. <span>Thank you.</span>
</p> // You can get creative. I used a span to render 2 colors to match my header button design with the messages.
)}
{responseStatus === 'failure' && ( // Condition 3.
<p>
Failure. <span>Please try again.</span>
</p>
)}
</>
);
}And that's all you need for setting up Mailchimp via Next API! If you like my style of explanation, feel free to subscribe to my newsletter - in the header - to experience the component you just studied:)